Ggplot2 တွင် axis tick count ကိုဘယ်လိုပြောင်းနည်း (ဥပမာများနှင့်အတူ)
ggplot2 ရှိ ကွက်များပေါ်ရှိ ဝင်ရိုးအမှန်ခြစ်များ အရေအတွက်ကို ပြောင်းလဲရန် အောက်ပါအခြေခံအထားအသိုကို အသုံးပြုနိုင်သည်။
 p+
  scale_x_continuous(n. breaks = 10 ) +
  scale_y_continuous(n. breaks = 10 )
အောက်ဖော်ပြပါ ဥပမာသည် ဤ syntax ကို လက်တွေ့တွင် မည်သို့အသုံးပြုရမည်ကို ပြသထားသည်။
ဥပမာ- ggplot2 တွင် ဝင်ရိုးအမှတ်အသားများကို ပြောင်းလဲပါ။
R တွင် အောက်ပါ data frame ရှိသည်ဆိုပါစို့။
 #create data frame
df <- data. frame (x=c(1, 2, 4, 5, 6, 8, 12, 14, 19),
                 y=c(2, 5, 7, 8, 14, 19, 22, 28, 36))

#view data frame
df

   xy
1 1 2
2 2 5
3 4 7
4 5 8
5 6 14
6 8 19
7 12 22
8 14 28
9 19 36
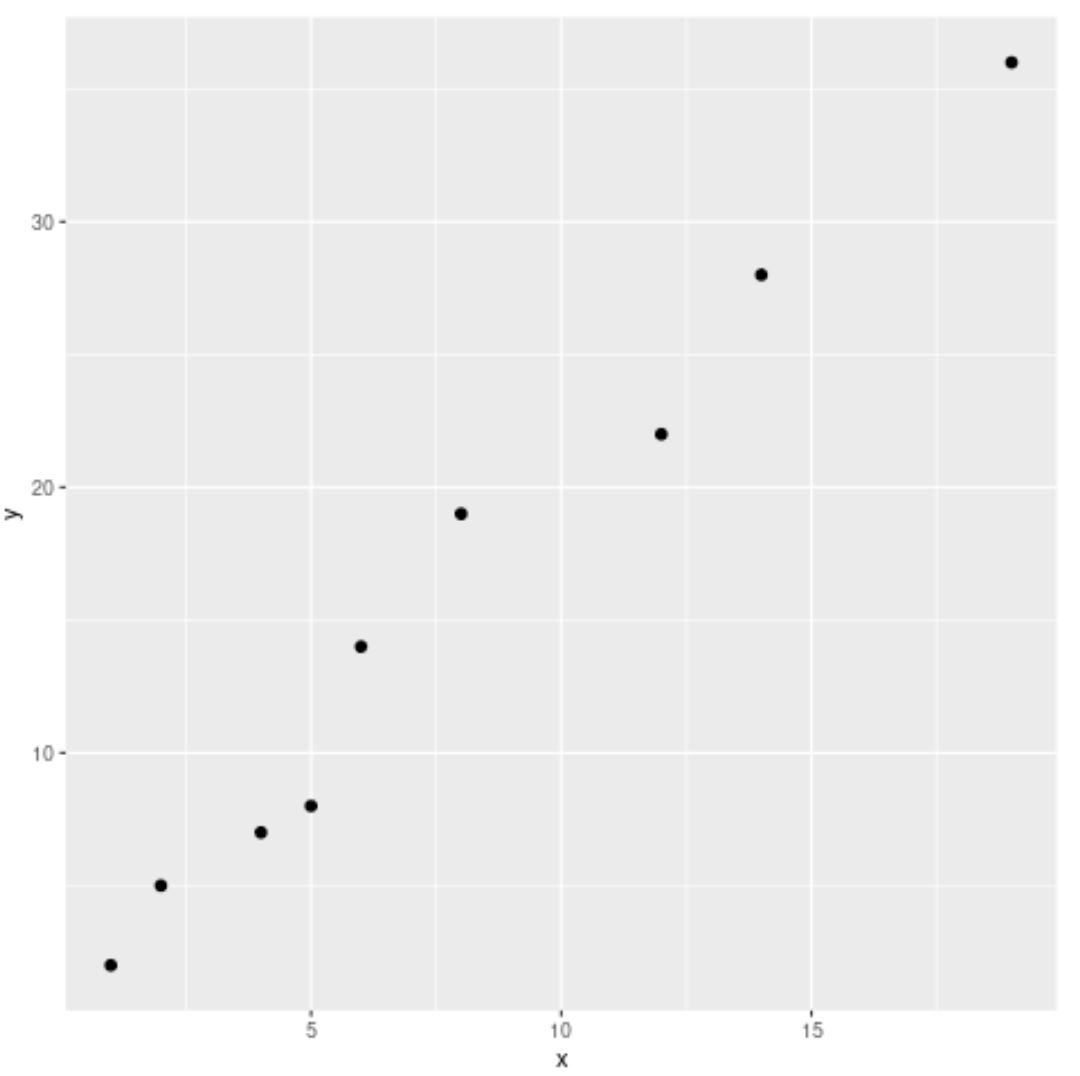
ကျွန်ုပ်တို့သည် scatterplot တစ်ခုကို ဖန်တီးပါက၊ ggplot2 သည် x-axis နှင့် y-axis အတွက် သင့်လျော်သော tick အရေအတွက်ကို အလိုအလျောက် ရွေးချယ်ပေးလိမ့်မည်-
 library (ggplot2)

#create scatterplot
ggplot(df, aes(x=x, y=y)) +
  geom_point(size= 2 )
သို့သော်လည်း၊ axes နှစ်ခုလုံးတွင် အသုံးပြုရန် tick အရေအတွက်အတိအကျကို သတ်မှတ်ရန် n.breaks argument ကို အသုံးပြုနိုင်ပါသည်။
 library (ggplot2)

#create scatter plot with custom number of ticks
ggplot(df, aes(x=x, y=y)) +
  geom_point(size= 2 ) +
  scale_x_continuous(n. breaks = 10 ) +
  scale_y_continuous(n. breaks = 10 )
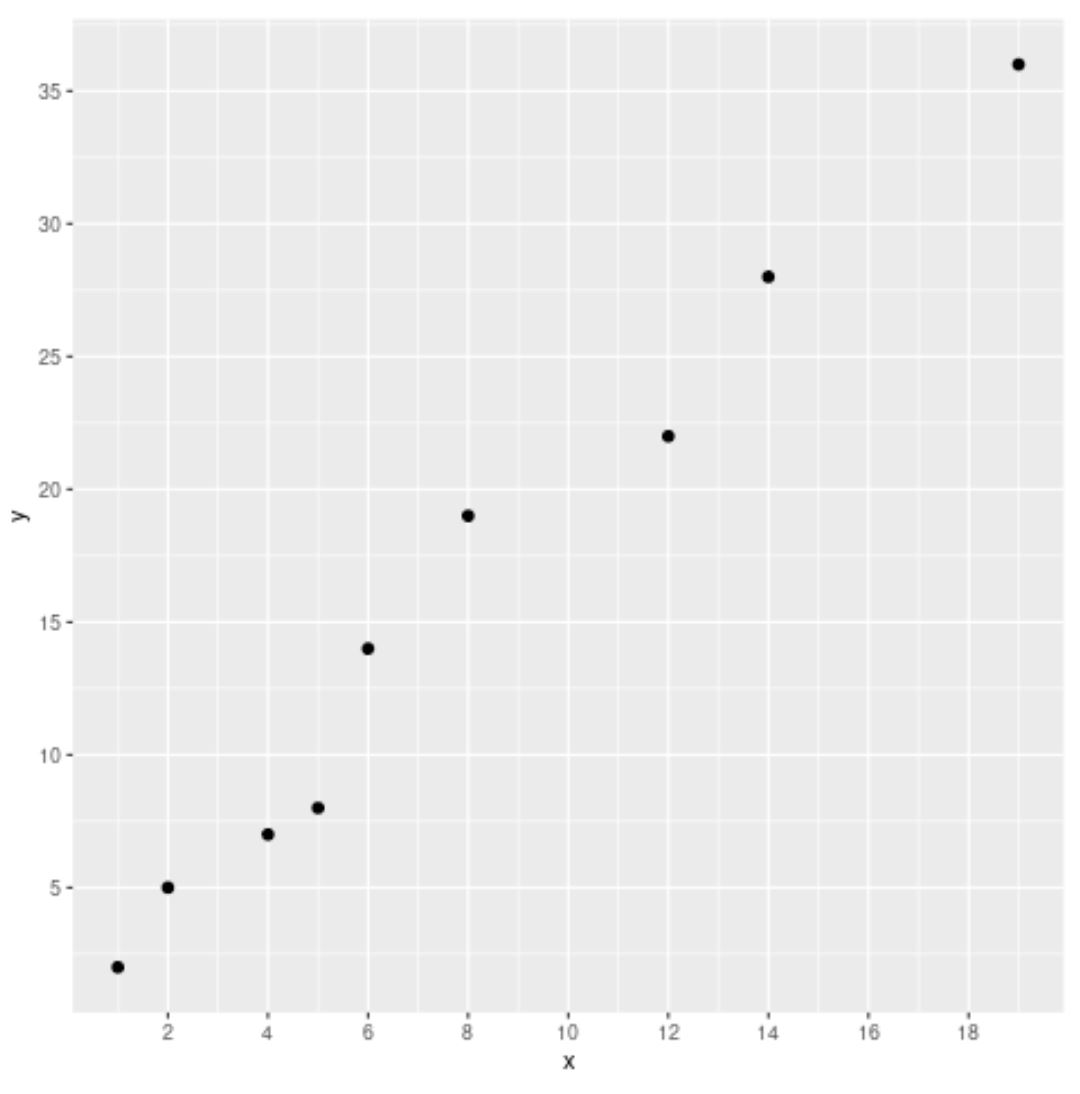
axes နှစ်ခုလုံးရှိ tick အရေအတွက် တိုးလာကြောင်း သတိပြုပါ။
သင်ဆန္ဒရှိလျှင် ဝင်ရိုးတစ်ခုတည်းရှိ အမှတ်အသားများကို ပြောင်းလဲနိုင်သည်ကို သတိပြုပါ-
 library (ggplot2)

#create scatter plot with custom number of ticks on x-axis only
ggplot(df, aes(x=x, y=y)) +
  geom_point(size= 2 ) +
  scale_x_continuous(n. breaks = 20 )
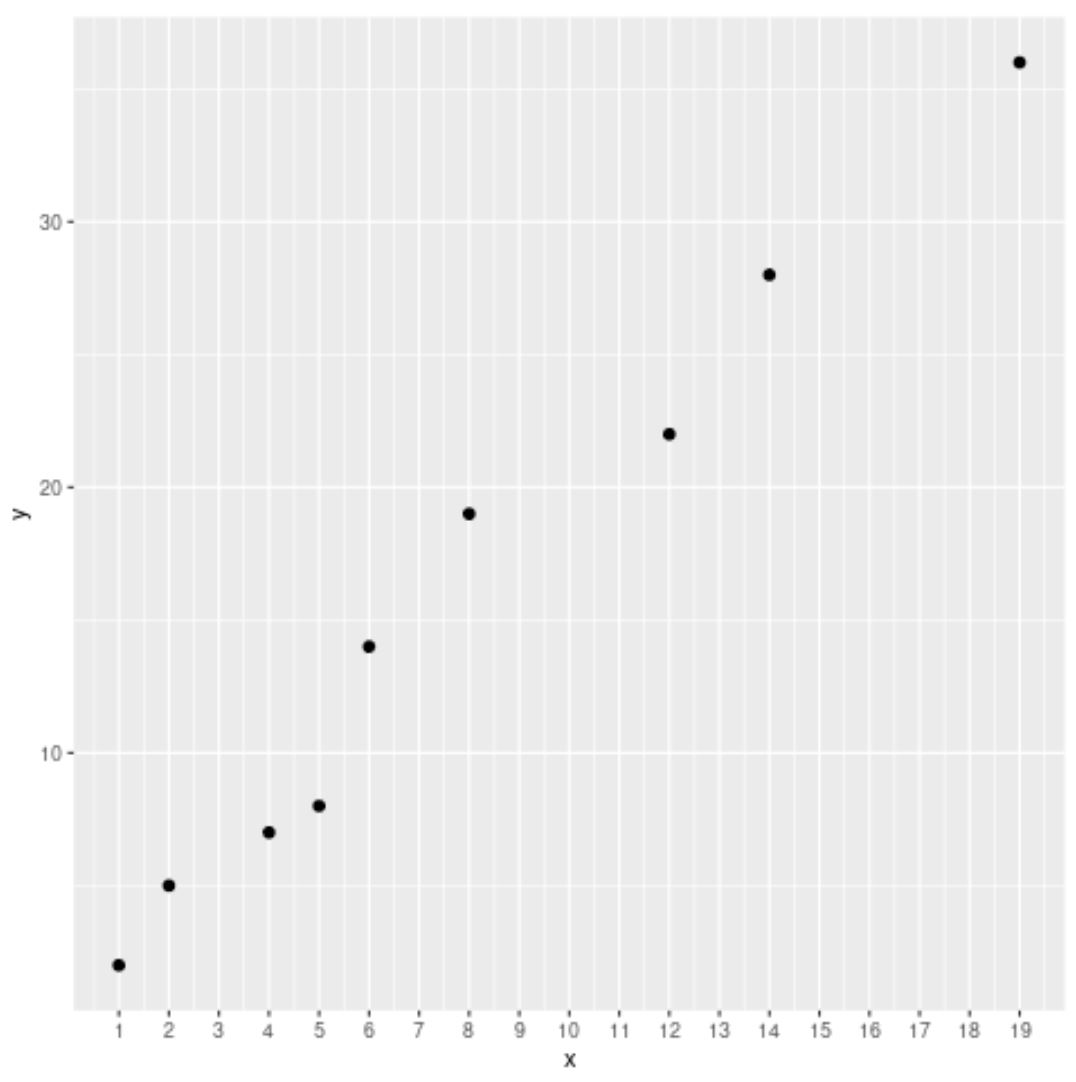
ဤဥပမာတွင်၊ ggplot2 သည် y-ဝင်ရိုးတွင်အသုံးပြုရန် tick အရေအတွက်ကို ရွေးချယ်သော်လည်း x-axis ရှိ tick အရေအတွက်ကို n.breaks အငြင်းအခုံရှိ နံပါတ်ဖြင့် ဆုံးဖြတ်သည်။
ထပ်လောင်းအရင်းအမြစ်များ
အောက်ဖော်ပြပါ သင်ခန်းစာများသည် ggplot2 တွင် အခြားဘုံအလုပ်များကို မည်သို့လုပ်ဆောင်ရမည်ကို ရှင်းပြသည်-
ggplot2 တွင် ဝင်ရိုးတံဆိပ်များကို လှည့်နည်း
ggplot2 တွင် ဝင်ရိုးကွဲများကို သတ်မှတ်နည်း
ggplot2 တွင် ဝင်ရိုးကန့်သတ်ချက်များကို မည်သို့သတ်မှတ်မည်နည်း။
ggplot2 တွင် ဒဏ္ဍာရီအညွှန်းများကို မည်သို့ပြောင်းရမည်နည်း။
စာရေးသူအကြောင်း
Benjamin Anderson
မင်္ဂလာပါ၊ ကျွန်ုပ်သည် အငြိမ်းစား စာရင်းအင်း ပါမောက္ခ ဘင်ဂျမင်ဖြစ်ပြီး သီးသန့် Statorials ဆရာအဖြစ် လှည့်ပတ်ပါသည်။ စာရင်းဇယားနယ်ပယ်တွင် ကျယ်ပြန့်သောအတွေ့အကြုံနှင့် ကျွမ်းကျင်မှုနှင့်အတူ၊ Statorials မှတစ်ဆင့် ကျောင်းသားများကို ခွန်အားဖြစ်စေရန်အတွက် ကျွန်ုပ်၏အသိပညာကို မျှဝေလိုပါသည်။ ပိုသိတယ်။