Ggplot2 တွင် scale_x_continuous ကိုအသုံးပြုနည်း (ဥပမာများနှင့်အတူ)
ပေးထားသောကွက်တစ်ခု၏ x-axis ကို စိတ်ကြိုက်ပြင်ဆင်ရန် ggplot2 ရှိ scale_x_continuous() လုပ်ဆောင်ချက်ကို သင်အသုံးပြုနိုင်ပါသည်။
ဤလုပ်ဆောင်ချက်သည် အောက်ပါအခြေခံ syntax ကိုအသုံးပြုသည်-
 p+
scale_x_continuous(breaks, n.breaks, labels, limits, ...)
ရွှေ-
- breaks : x-axis ပေါ်ရှိ breaks များအတွက် ကိန်းဂဏာန်း vector တစ်ခု
- n.breaks : x-axis ပေါ်ရှိ စုစုပေါင်း breaks အရေအတွက်ကို သတ်မှတ်သည့် ကိန်းပြည့် vector တစ်ခု
- labels : x-axis အတွက် အသုံးပြုရန် အညွှန်းများ၏ အက္ခရာ vector တစ်ခု
- ကန့် သတ်ချက်များ – x-ဝင်ရိုးအတွက် min နှင့် max တန်ဖိုးများကို သတ်မှတ်ပေးသည့် ကိန်းဂဏာန်း vector တစ်ခု
အောက်ပါဥပမာများသည် R ရှိ ဒေတာဘောင်ဖြင့် မတူညီသောအခြေအနေများတွင် ဤလုပ်ဆောင်ချက်ကို အသုံးပြုနည်းကို ပြသသည်-
 #create data frame
df <- data. frame (points=c(5, 7, 12, 13, 15, 19, 22, 25),
                 assists=c(4, 3, 2, 3, 7, 8, 5, 7))

#view data frame
df

  assist points
1 5 4
2 7 3
3 12 2
4 13 3
5 15 7
6 19 8
7 22 5
8 25 7
ဥပမာ 1- စိတ်ကြိုက်ဝင်ရိုးအခွဲများဖြင့် scale_x_continuous ကိုသုံးပါ။
အောက်ပါကုဒ်သည် ggplot2 တွင် scatterplot ဖန်တီးနည်းကိုပြသပြီး 5၊ 15 နှင့် 25 တို့၏စိတ်ကြိုက်ဝင်ရိုးအခွဲများကိုသတ်မှတ်ရန် breaks argument ဖြင့် scale_x_continuous() ကိုအသုံးပြုသည်-
 library (ggplot2)

#create scatterplot with custom x-axis breaks
ggplot(df, aes(x=points, y=assists)) +
  geom_point(size= 2 ) +
  scale_x_continuous(breaks=c(5, 15, 25))
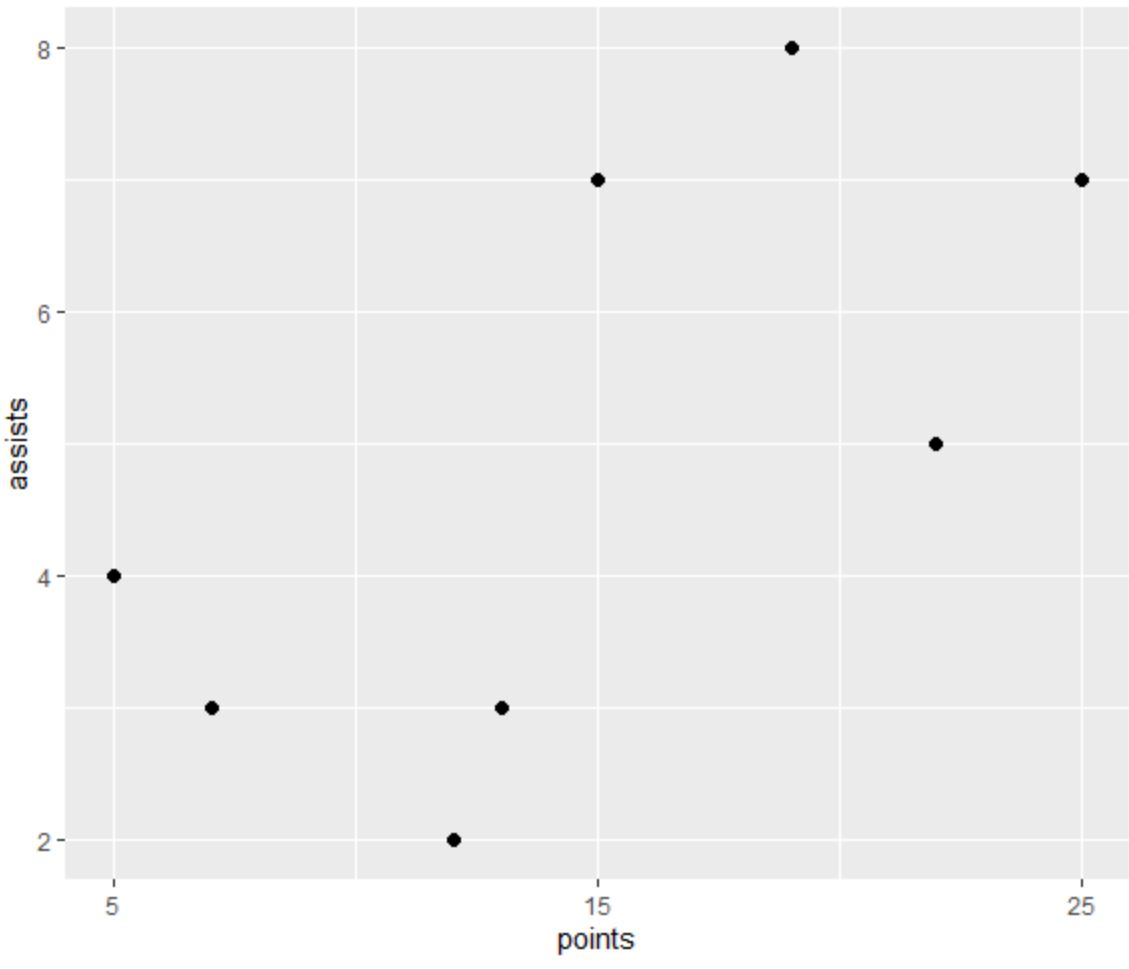
breaks argument ကိုအသုံးပြု၍ ကျွန်ုပ်တို့သတ်မှတ်ထားသည့်အတိုင်း x-axis တွင် ဝင်ရိုးကွဲများ 5၊ 15 နှင့် 25 တွင်သာပါဝင်သည်ကို သတိပြုပါ။
ဥပမာ 2- စိတ်ကြိုက်ခေတ္တရပ်နားမှုအရေအတွက်ဖြင့် scale_x_continuous ကိုသုံးပါ။
အောက်ဖော်ပြပါ ကုဒ်သည် ggplot2 တွင် ဖြန့်ခွဲကွက်တစ်ခု ဖန်တီးနည်းကို ပြသပြီး x-axis ပေါ်တွင် 12 ဝင်ရိုးအခွဲများကို အတိအကျနေရာချရန် scale_x_continuous () ကို အသုံးပြုပါ-
 library (ggplot2)

#create scatterplot with custom number of breaks on x-axis
ggplot(df, aes(x=points, y=assists)) +
  geom_point(size= 2 ) +
  scale_x_continuous(n. breaks = 12 )
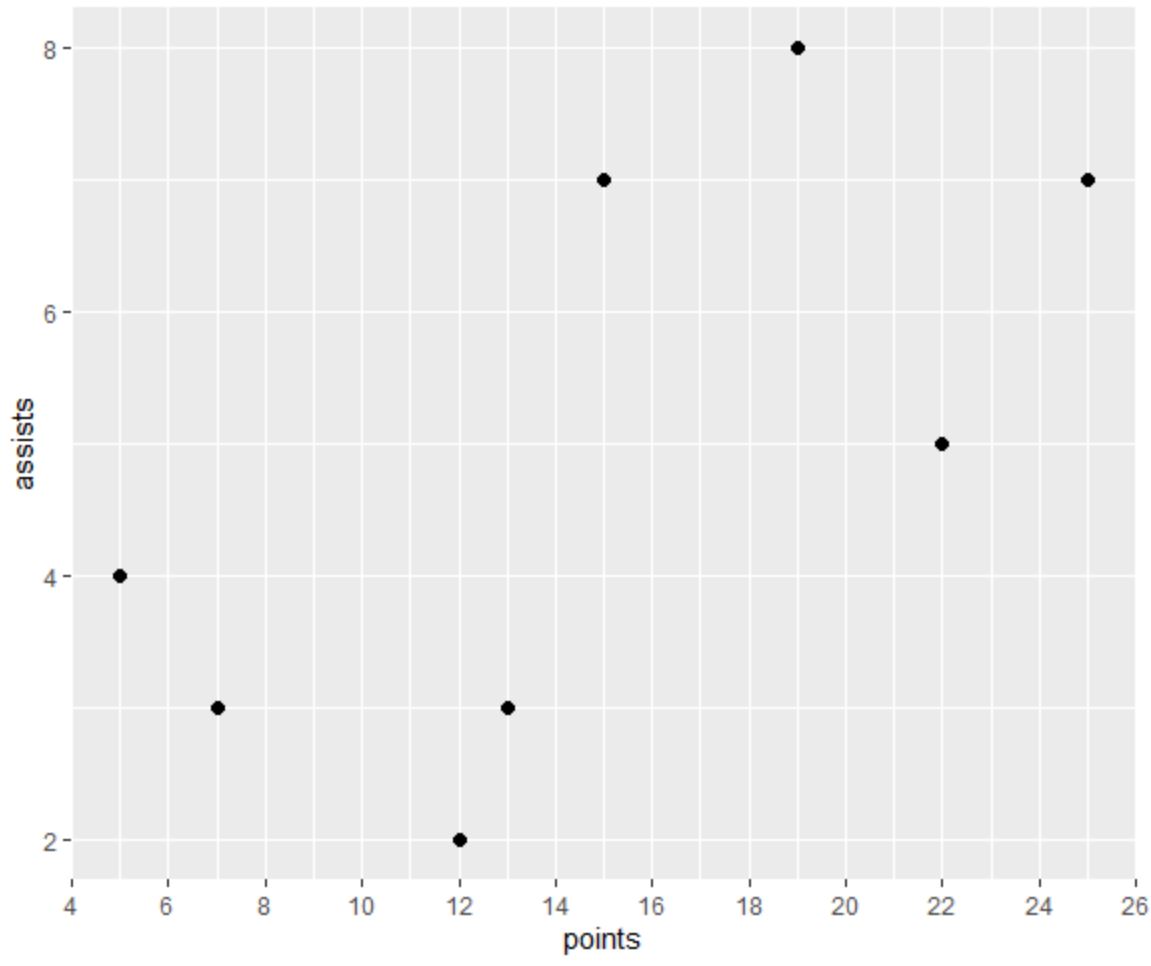
n.breaks အငြင်းအခုံကိုအသုံးပြု၍ ကျွန်ုပ်တို့သတ်မှတ်ထားသည့်အတိုင်း x-axis တွင် ဝင်ရိုးကွဲ 12 ခုတိတိပါဝင်သည်ကို သတိပြုပါ။
ဥပမာ 3- စိတ်ကြိုက်တံဆိပ်များဖြင့် scale_x_continuous ကိုသုံးပါ။
အောက်ဖော်ပြပါကုဒ်သည် ggplot2 တွင် scatterplot ဖန်တီးနည်းကိုပြသပြီး x-axis တွင်ထားရန်အညွှန်းအမည်များကိုသတ်မှတ်ရန် အညွှန်းများ ပါသည့်အငြင်းအခုံများဖြင့် scale_x_continuous() ကိုအသုံးပြုသည်-
 library (ggplot2)

#create scatterplot with custom labels on x-axis
ggplot(df, aes(x=points, y=assists)) +
  geom_point(size= 2 ) +
  scale_x_continuous(breaks=c(5, 15, 25), labels=c(' five ', ' fifteen ', ' twenty-five '))
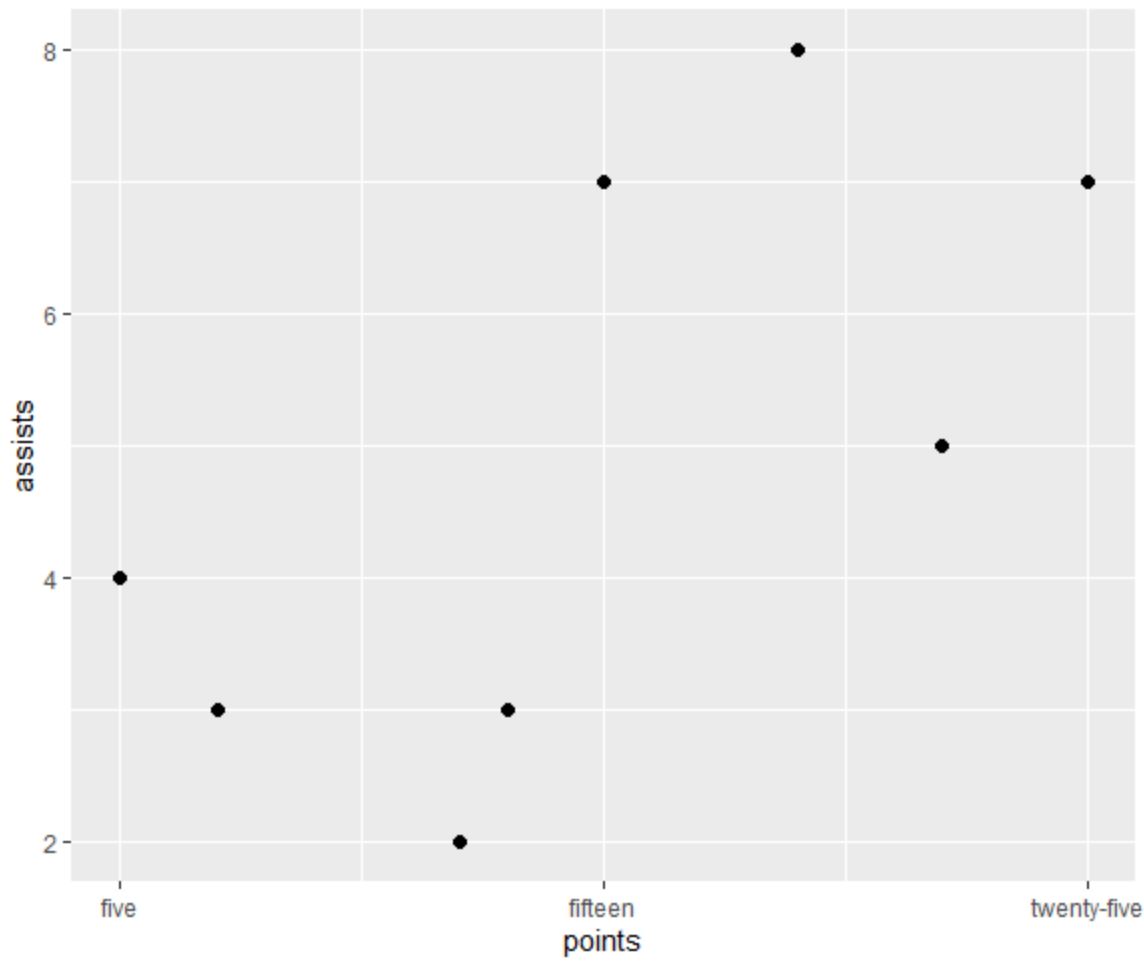
ကျွန်ုပ်တို့သတ်မှတ်ထားသည့်အတိုင်း x-axis တွင် ဝင်ရိုးကွဲ 3 ခုပါရှိသည်၊ တစ်ခုစီတွင် labels argument ကိုအသုံးပြု၍ စိတ်ကြိုက်တံဆိပ်များပါရှိသည်။
ဥပမာ 4- စိတ်ကြိုက်ကန့်သတ်ချက်များဖြင့် scale_x_continuous ကိုသုံးပါ။
အောက်ဖော်ပြပါကုဒ်သည် ggplot2 တွင် ခွဲခြမ်းစိတ်ဖြာမှုကွက်ကွက်ဖန်တီးနည်းကိုပြသပြီး x-ဝင်ရိုးပေါ်တွင် 0 နှင့် 40 တို့၏စိတ်ကြိုက်ကန့်သတ်ချက်များကိုသတ်မှတ်ရန် ကန့်သတ် အငြင်းပွားမှုများနှင့်အတူ scale_x_continuous() ကို အသုံးပြုသည်-
 library (ggplot2)

#create scatterplot with custom x-axis limits
ggplot(df, aes(x=points, y=assists)) +
  geom_point(size= 2 ) +
  scale_x_continuous(limits=c( 0 , 40 ))
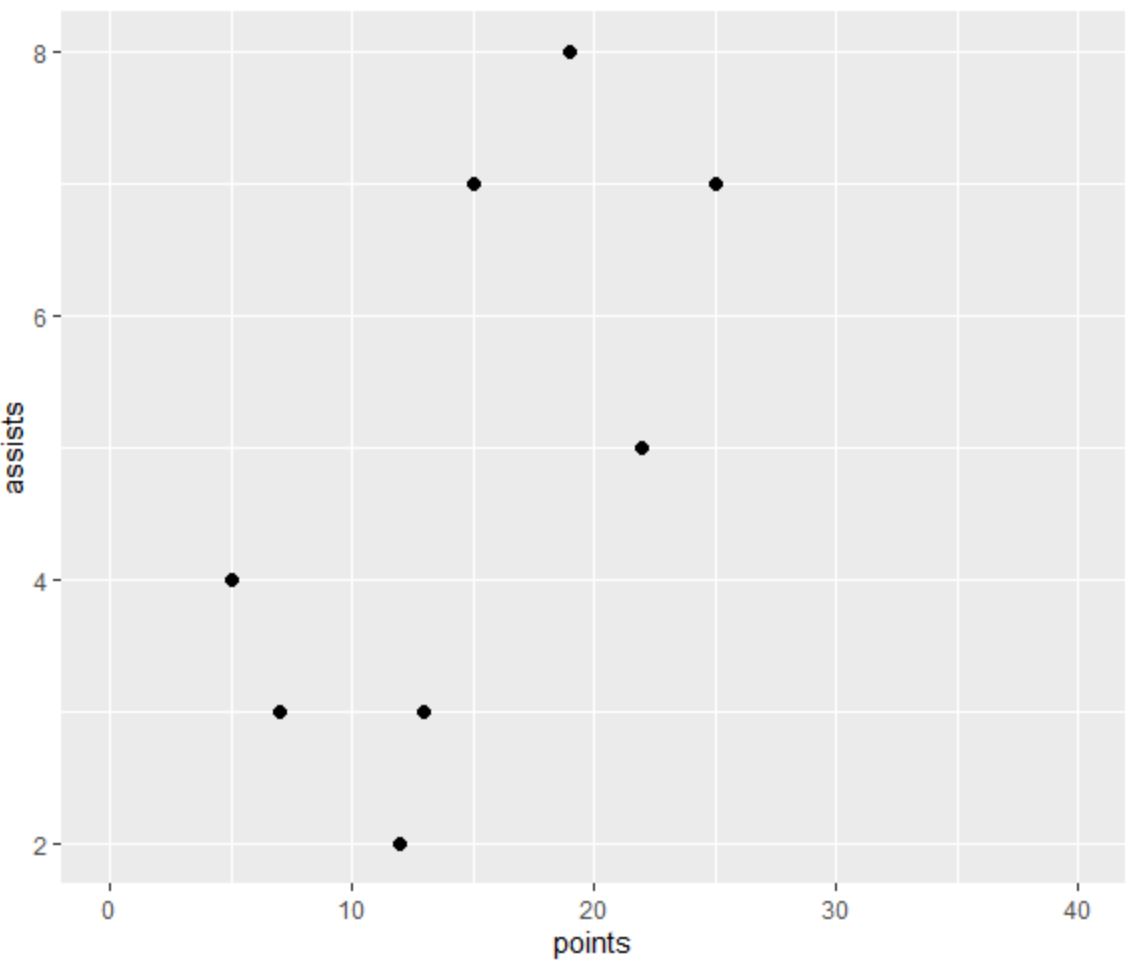
ကျွန်ုပ်တို့ သတ်မှတ်ထား သည့်အတိုင်း x-axis သည် 0 မှ 40 သို့သွားသည်ကို သတိပြုပါ။
ထပ်လောင်းအရင်းအမြစ်များ
အောက်ဖော်ပြပါ သင်ခန်းစာများသည် ggplot2 တွင် အခြားဘုံအလုပ်များကို မည်သို့လုပ်ဆောင်ရမည်ကို ရှင်းပြသည်-
ggplot2 တွင် scale_y_continuous ကိုအသုံးပြုနည်း
ggplot2 တွင် ဝင်ရိုးတံဆိပ်များကို လှည့်နည်း
ggplot2 တွင် ဒဏ္ဍာရီအညွှန်းများကို မည်သို့ပြောင်းရမည်နည်း။
စာရေးသူအကြောင်း
Benjamin Anderson
မင်္ဂလာပါ၊ ကျွန်ုပ်သည် အငြိမ်းစား စာရင်းအင်း ပါမောက္ခ ဘင်ဂျမင်ဖြစ်ပြီး သီးသန့် Statorials ဆရာအဖြစ် လှည့်ပတ်ပါသည်။ စာရင်းဇယားနယ်ပယ်တွင် ကျယ်ပြန့်သောအတွေ့အကြုံနှင့် ကျွမ်းကျင်မှုနှင့်အတူ၊ Statorials မှတစ်ဆင့် ကျောင်းသားများကို ခွန်အားဖြစ်စေရန်အတွက် ကျွန်ုပ်၏အသိပညာကို မျှဝေလိုပါသည်။ ပိုသိတယ်။