วิธีเพิ่มตารางลงในแปลงใน ggplot2 (2 ตัวอย่าง)
บ่อยครั้งที่คุณอาจต้องการเพิ่มตารางลงในแปลงที่สร้างใน ggplot2 ใน R เพื่อให้ผู้อ่านเห็นภาพข้อมูลดิบพร้อมกับโครงเรื่อง
โชคดีที่การเพิ่มตารางลงแปลงโดยใช้แพ็คเกจ ggpmisc เป็นเรื่องง่าย:
 install. packages (' ggpmisc ')
library (ggpmisc)
ตัวอย่างต่อไปนี้แสดงวิธีใช้แพ็คเกจนี้เพื่อเพิ่มตารางลงใน barplot และ scatterplot โดยใช้กรอบข้อมูลต่อไปนี้:
 #create data frame
df <- data. frame (team=c('A', 'A', 'A', 'A', 'B', 'B', 'B', 'B'),
                 position=c('G', 'G', 'F', 'F', 'G', 'G', 'F', 'F'),
                 points=c(13, 23, 24, 20, 19, 14, 29, 31))

#view data frame
df

  team position points
1 AG 13
2 AG 23
3 AF 24
4 AF 20
5 BG 19
6 BG 14
7 BF 29
8 BF 31
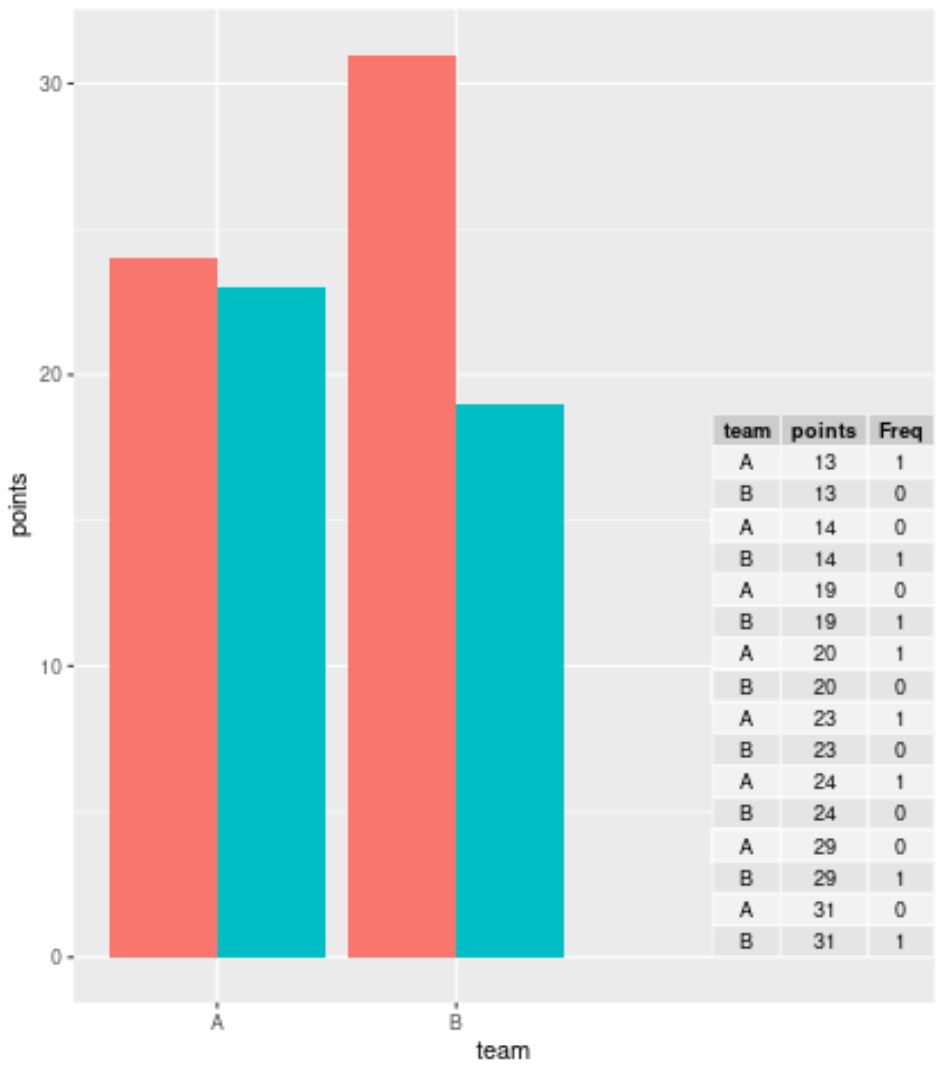
ตัวอย่างที่ 1: เพิ่มตารางลงใน Barplot ใน ggplot2
เราสามารถใช้โค้ดต่อไปนี้เพื่อสร้าง barplot ที่จัดกลุ่มใน ggplot2 และเพิ่มตารางที่มุมขวาล่างของ plot เพื่อแสดงค่าที่แท้จริงของ data frame:
 library (ggplo2)
library (ggpmisc)

#create barplot with table
ggplot(df, aes(x=team, y=points, fill=position)) +
    geom_bar(position=' dodge ', stat=' identity ') +
    annotate(geom = ' table ',
           x=4,
           y=0,
           label=list(df))

หากคุณกำลังทำงานกับชุดข้อมูลขนาดใหญ่และไม่ต้องการแสดงแต่ละแถว คุณสามารถใช้ฟังก์ชัน table() เพื่อสรุปข้อมูลก่อนที่จะสร้างตารางใน ggplot2:
 library (ggplot2)
library (ggpmisc)

#summarize frequencies of team and points in table
my_table <- as. data . frame (table(df[, c(1, 3)]))

#create barplot with table
ggplot(df, aes(x=team, y=points, fill=position)) +
    geom_bar(position=' dodge ', stat=' identity ') +
    annotate(geom = ' table ',
           x=4,
           y=0,
           label=list(my_table))
ตัวอย่างที่ 2: เพิ่มตารางลงใน Scatterplot ใน ggplot2
เราสามารถใช้โค้ดต่อไปนี้เพื่อสร้าง Scatterplot ใน ggplot2 และเพิ่มตารางที่มุมขวาล่างของ Plot เพื่อแสดงค่าจริงจาก Data Frame:
 library (ggplo2)
library (ggpmisc)

#create scatterplot with table
ggplot(df, aes(x=team, y=points)) +
    geom_point(aes(color=position)) +
    annotate(geom=' table ',
           x=4,
           y=0,
           label=list(df))
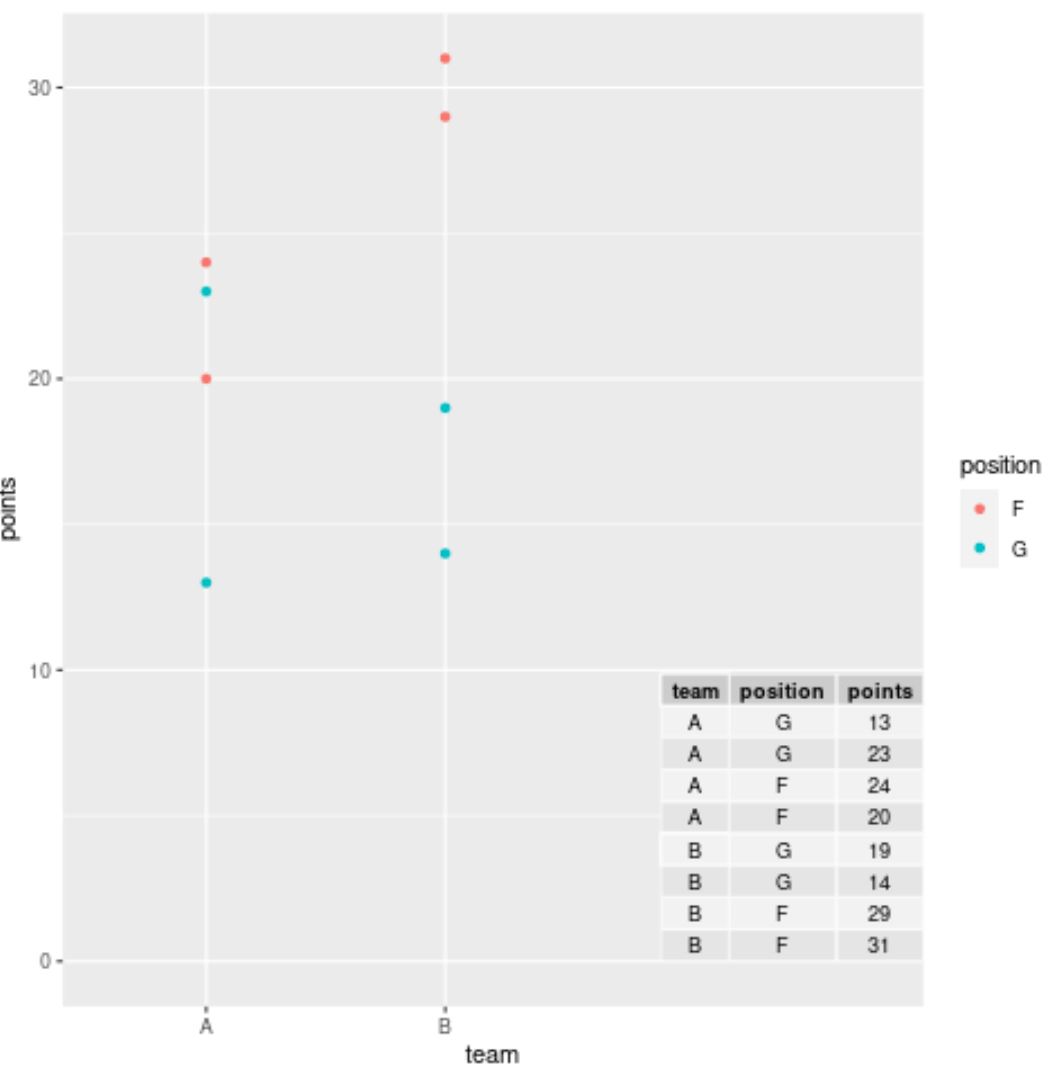
หมายเหตุ : อย่าลังเลที่จะเล่นกับค่า x และ y ในฟังก์ชัน คำอธิบายประกอบ () เพื่อวางอาร์เรย์ในตำแหน่งที่แน่นอนที่คุณต้องการ
แหล่งข้อมูลเพิ่มเติม
บทช่วยสอนต่อไปนี้จะอธิบายวิธีดำเนินการงานทั่วไปอื่นๆ ใน ggplot2:
วิธีเพิ่มข้อความลงในแปลง ggplot2
วิธีเปลี่ยนตำแหน่งหัวเรื่องใน ggplot2
วิธีเปลี่ยนลำดับของรายการในตำนาน ggplot2
เกี่ยวกับผู้แต่ง
ดร.เบนจามิน แอนเดอร์สัน
สวัสดี ฉันชื่อเบนจามิน ศาสตราจารย์สถิติเกษียณอายุแล้ว และผันตัวมาเป็นครูสอนสถิติโดยเฉพาะ ด้วยประสบการณ์และความเชี่ยวชาญที่กว้างขวางในสาขาสถิติ ฉันกระตือรือร้นที่จะแบ่งปันความรู้ของฉันเพื่อเสริมศักยภาพนักเรียนผ่าน Statorials. รู้เพิ่มเติม