วิธีการวาดเส้นที่พอดีที่สุดใน python (พร้อมตัวอย่าง)
คุณสามารถใช้ไวยากรณ์พื้นฐานต่อไปนี้เพื่อวาดเส้นที่เหมาะสมที่สุดใน Python:
 #find line of best fit
a, b = np. polyfit (x, y, 1)

#add points to plot
plt. scatter (x,y)

#add line of best fit to plot
plt. plot (x, a*x+b)
ตัวอย่างต่อไปนี้แสดงวิธีใช้ไวยากรณ์นี้ในทางปฏิบัติ
ตัวอย่างที่ 1: การวางแผนพื้นฐานที่เหมาะสมที่สุดใน Python
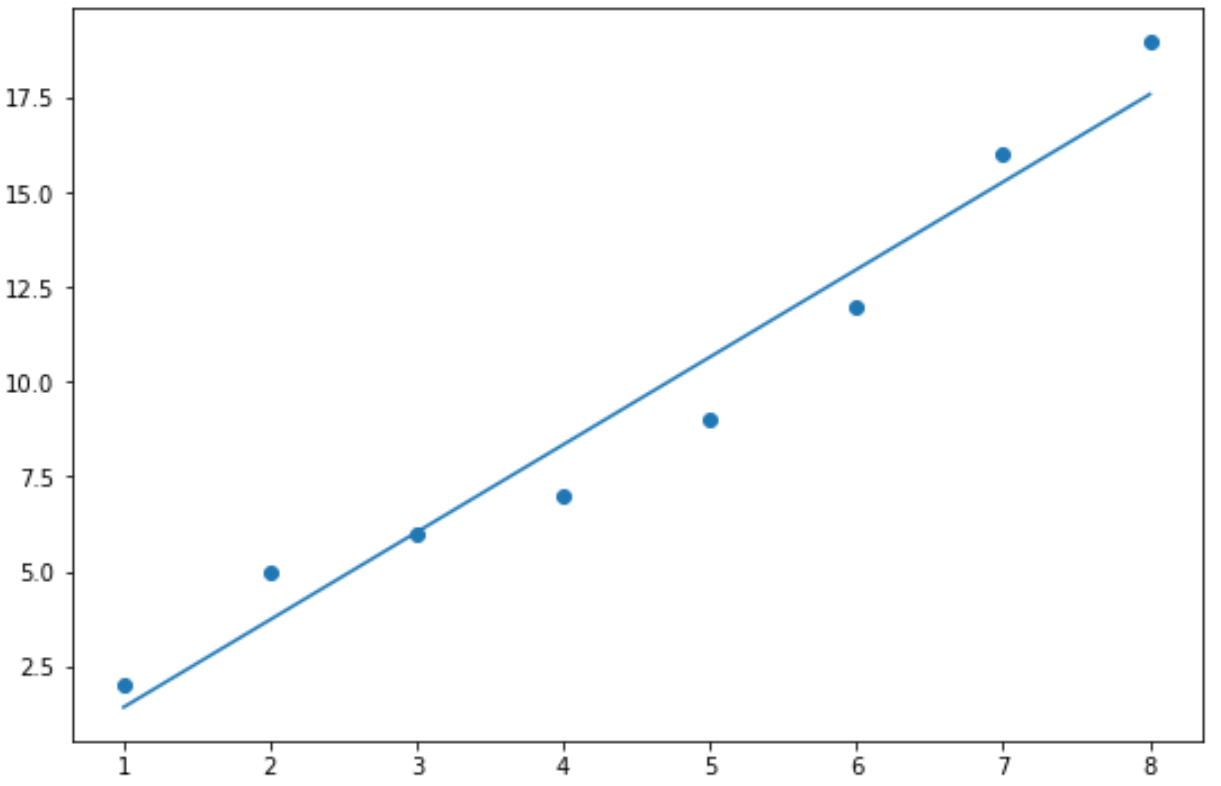
รหัสต่อไปนี้แสดงวิธีการวาดเส้นฐานที่เหมาะสมที่สุดใน Python:
 import numpy as np
import matplotlib. pyplot as plt

#define data
x = np. array ([1, 2, 3, 4, 5, 6, 7, 8])
y = np. array ([2, 5, 6, 7, 9, 12, 16, 19])

#find line of best fit
a, b = np. polyfit (x, y, 1)

#add points to plot
plt. scatter (x,y)

#add line of best fit to plot
plt. plot (x, a*x+b)
ตัวอย่างที่ 2: การวาดเส้นแบบกำหนดเองที่พอดีที่สุดใน Python
รหัสต่อไปนี้แสดงวิธีการสร้างบรรทัดที่เหมาะสมที่สุดเหมือนกับตัวอย่างก่อนหน้านี้ โดยมีการเพิ่มเติมต่อไปนี้:
- สีที่กำหนดเองสำหรับจุดและเส้นที่พอดีที่สุด
- สไตล์และความกว้างที่กำหนดเองเพื่อให้ได้เส้นที่เหมาะสมที่สุด
- สมการของเส้นถดถอยพอดีที่แสดงบนโครงเรื่อง
 import numpy as np
import matplotlib. pyplot as plt

#define data
x = np. array ([1, 2, 3, 4, 5, 6, 7, 8])
y = np. array ([2, 5, 6, 7, 9, 12, 16, 19])

#find line of best fit
a, b = np. polyfit (x, y, 1)

#add points to plot
plt. scatter (x,y,color=' purple ')

#add line of best fit to plot
plt. plot (x, a*x+b, color=' steelblue ', linestyle=' -- ', linewidth= 2 )

#add fitted regression equation to plot
plt. text (1, 17, 'y = ' + '{:.2f}'. format (b) + ' + {:.2f}'. format (a) + 'x', size= 14 )
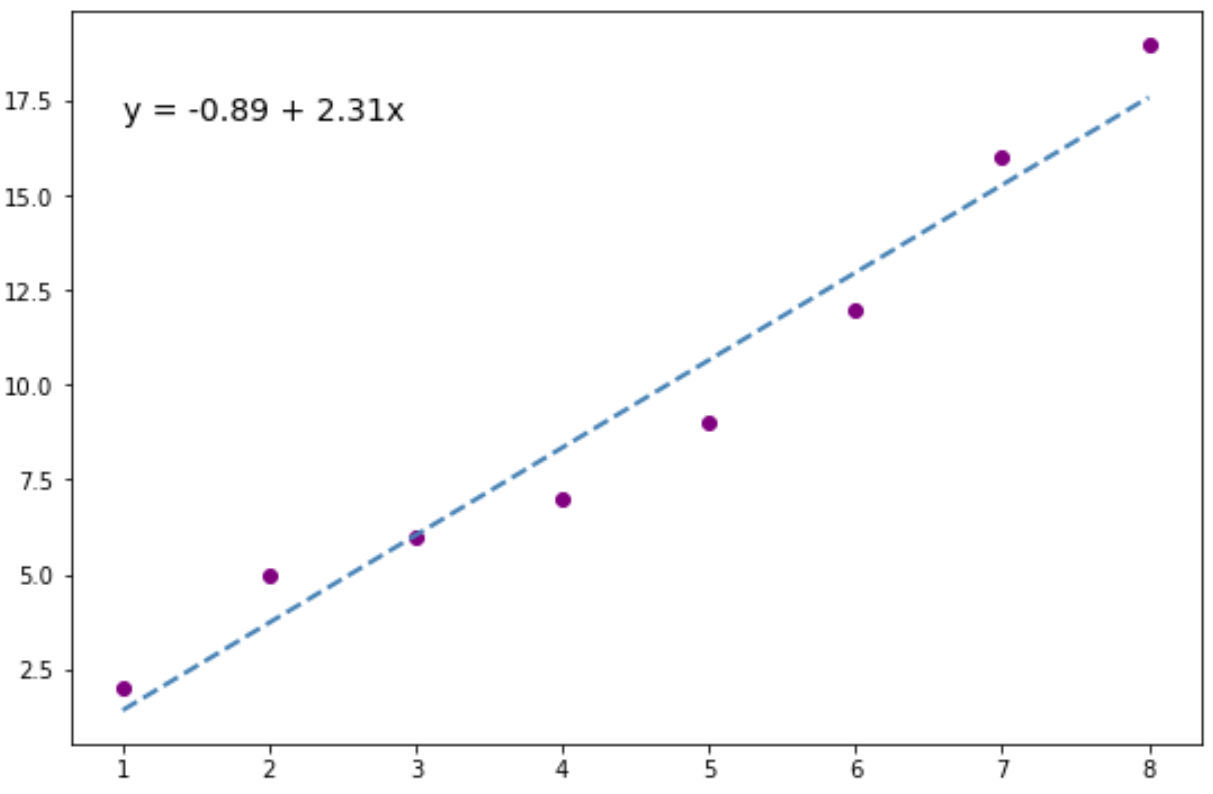
คุณสามารถวางสมการการถดถอยที่ติดตั้งไว้ในพิกัด (x,y) ใดก็ได้ที่คุณต้องการบนโครงเรื่อง
สำหรับตัวอย่างนี้ เราเลือก (x, y) = (1, 17)
แหล่งข้อมูลเพิ่มเติม
บทช่วยสอนต่อไปนี้จะอธิบายวิธีปรับโมเดลการถดถอยที่แตกต่างกันใน Python:
คู่มือฉบับสมบูรณ์เกี่ยวกับการถดถอยเชิงเส้นใน Python
วิธีดำเนินการถดถอยพหุนามใน Python
วิธีดำเนินการถดถอยเชิงปริมาณใน Python
เกี่ยวกับผู้แต่ง
ดร.เบนจามิน แอนเดอร์สัน
สวัสดี ฉันชื่อเบนจามิน ศาสตราจารย์สถิติเกษียณอายุแล้ว และผันตัวมาเป็นครูสอนสถิติโดยเฉพาะ ด้วยประสบการณ์และความเชี่ยวชาญที่กว้างขวางในสาขาสถิติ ฉันกระตือรือร้นที่จะแบ่งปันความรู้ของฉันเพื่อเสริมศักยภาพนักเรียนผ่าน Statorials. รู้เพิ่มเติม